
Introduction
Room-in-roof insulation is a highly effective method of insulating the space within the roof of a building. This technique is commonly used in attics or loft spaces to improve energy efficiency, reduce heat loss, and create a more comfortable living environment. In this comprehensive guide, we will explore the benefits of room-in-roof insulation, the installation process, insulation materials, and important considerations to ensure optimal performance and energy savings in your home.
Benefits of Room-in-Roof Insulation
- Energy Efficiency: One of the primary benefits of room-in-roof insulation is its ability to improve energy efficiency. By insulating the roof space, it helps to prevent heat loss during cold weather and minimize heat gain during hot weather. This results in reduced energy consumption for heating and cooling, leading to lower utility bills and a smaller carbon footprint.
- Increased Comfort: Room-in-roof insulation provides increased comfort by maintaining a more consistent temperature within the living space. It helps to eliminate cold spots and drafts, creating a cozy environment in the attic or loft area. This is particularly beneficial if you use the space as a bedroom, office, or recreational area.
- Condensation Control: Insulating the roof space can help control condensation issues. By reducing temperature differences between the interior and exterior surfaces of the roof, it minimizes the risk of condensation forming on the underside of the roof and causing dampness or mold growth. This helps to maintain a healthier indoor environment.
- Noise Reduction: Room-in-roof insulation also provides acoustic benefits by reducing external noise transmission. It helps to dampen sounds from rain, wind, and other external sources, creating a quieter and more peaceful living space.
- Increased Property Value: Adding room-in-roof insulation to your home can increase its value. The improved energy efficiency and comfort levels make the property more attractive to potential buyers or tenants, offering a unique selling point and potential cost savings in the long run.
Installation Process
Installing room-in-roof insulation involves several key steps:
- Assessment and Preparation: Begin by assessing the existing roof structure and determining the most suitable insulation method. Consider factors such as the type of roof, access points, and any potential obstacles. Clear the roof space of any debris or unnecessary items.
- Insulation Material Selection: Choose the appropriate insulation material for your room-in-roof project. Common options include mineral wool, fiberglass, cellulose, or spray foam insulation. Consider factors such as thermal performance, fire resistance, and suitability for your specific roof type.
- Air Sealing: Before installing the insulation, it is crucial to air seal the roof space. This involves identifying and sealing any gaps, cracks, or openings that could allow air leakage. Use weatherstripping, caulk, or foam sealants to ensure a tight seal.
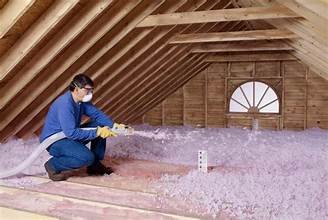
- Insulation Installation: Install the selected insulation material according to the manufacturer’s instructions. This may involve laying insulation rolls or batts between the roof rafters, installing insulation boards, or spraying foam insulation onto the underside of the roof. Ensure complete coverage and proper alignment to maximize thermal performance.
- Vapour Barrier Installation: In some cases, it may be necessary to install a vapor barrier to prevent moisture from entering the insulation. This is particularly important in colder climates where condensation can be a concern. Consult with a professional to determine if a vapor barrier is required for your specific situation.
- Finishing Touches: Once the insulation is in place, consider adding additional finishing touches to enhance the overall performance. This may include installing a reflective radiant barrier on the underside of the roof to further reduce heat transfer or adding insulation to access hatches or loft doors.
Insulation Materials for Room-in-Roof Insulation
- Mineral Wool: Mineral wool, also known as rock wool or stone wool, is a popular choice for room-in-roof insulation. It offers excellent thermal and acoustic insulation properties, is fire-resistant, and provides good moisture resistance. Mineral wool comes in various forms, including rolls, batts, or loose-fill insulation.
- Fiberglass: Fiberglass insulation is another commonly used material for room-in-roof applications. It is lightweight, easy to install, and offers good thermal performance. Fiberglass insulation is available in rolls or batts and is known for its affordability.
- Cellulose: Cellulose insulation is made from recycled paper or plant fibers and is an eco-friendly option for room-in-roof insulation. It provides excellent thermal performance, is resistant to mold and pests, and offers good sound absorption properties. Cellulose insulation is typically blown into the roof space using specialized equipment.
- Spray Foam: Spray foam insulation is a versatile option for room-in-roof applications. It expands to fill gapsand crevices, providing an airtight seal and excellent thermal insulation. Spray foam insulation can be applied directly to the underside of the roof, creating a seamless barrier. It also offers soundproofing benefits and helps to prevent moisture infiltration.
Important Considerations for Room-in-Roof Insulation
- Roof Ventilation: Proper roof ventilation is essential when insulating the roof space. It helps to prevent the buildup of moisture and maintain a healthy environment. Ensure that there is adequate ventilation in the attic or loft area, either through soffit vents, ridge vents, or gable vents.
- Building Regulations: Before undertaking any insulation work, familiarize yourself with the local building regulations and requirements. Some regions have specific guidelines for insulation installation, particularly in relation to fire safety and ventilation. Ensure compliance with these regulations to avoid any legal issues.
- Professional Installation: While room-in-roof insulation can be a DIY project, it is recommended to hire a professional insulation contractor for optimal results. They have the expertise and knowledge to assess your specific needs, recommend the right insulation materials, and ensure proper installation. Professional installation also ensures that the insulation meets all safety and performance standards.
- Moisture Management: Proper moisture management is crucial when insulating the roof space. Ensure that there are no existing moisture issues, such as leaks or dampness, before installing insulation. Address any underlying problems and ensure proper ventilation and drainage to prevent moisture buildup.
- Maintenance and Inspection: Regular maintenance and inspection of the room-in-roof insulation are important to ensure its long-term effectiveness. Check for any signs of damage, such as water stains or mold growth, and address them promptly. Inspect the insulation periodically to ensure it remains in good condition and provides optimal thermal performance.
Frequently Asked Questions (FAQ)
1. Is room-in-roof insulation suitable for all types of roofs?
Room-in-roof insulation can be installed in various types of roofs, including pitched roofs, flat roofs, and dormer roofs. However, the specific insulation method may vary depending on the roof design and structure. Consult with a professional insulation contractor to determine the most suitable insulation solution for your roof.
2. How much energy can I save with room-in-roof insulation?
The amount of energy savings achieved with room-in-roof insulation depends on various factors, including the existing insulation levels, climate, and heating/cooling habits. On average, homeowners can expect to save between 10% and 30% on their energy bills after installing room-in-roof insulation.
3. Can I install room-in-roof insulation myself?
Room-in-roof insulation can be a DIY project for those with adequate knowledge and experience. However, it is recommended to hire a professional insulation contractor for optimal results. They have the expertise to assess your specific needs, recommend the right insulation materials, and ensure proper installation.
4. How long does room-in-roof insulation last?
The lifespan of room-in-roof insulation depends on the type of insulation material used and the conditions it is exposed to. On average, insulation materials such as mineral wool or fiberglass can last for several decades. However, periodic maintenance and inspection are important to ensure its long-term effectiveness.
5. Can room-in-roof insulation cause condensation issues?
When installed correctly, room-in-roof insulation should not cause condensation issues. However, proper ventilation and moisture management are crucial to prevent moisture buildup. Ensure that there is adequate roof ventilation and address any existing moisture issues before installing insulation.
Conclusion
Room-in-roof insulation is a highly effective way to improve energy efficiency, increase comfort, and reduce heat loss in your home. By following the installation process, selecting the right insulation materials, and considering important factors such as roof ventilation and maintenance, you can optimize the performance of your room-in-roof insulation. Enjoy the benefits of a more energy-efficient and comfortable living space while reducing your carbon footprint.